This vintage 360 suffers from a fairly common Rickenbacker ailment. So we used a less common approach to correct the problem, improve the guitar’s performance, and maintain it’s original condition.
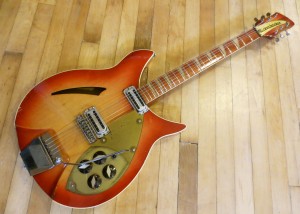
We see a lot of Rickenbacker basses and guitars in our shop. They are beautiful and unique sounding instruments that also happen to have some quirks that can drive repairmen crazy. For example, modern Rics use two truss rods to make the bass and treble sides of the neck independently adjustable. It’s useful, but the one additional adjustment can be time consuming because the oversized truss rod cover, engraved with the name Rickenbacker, requires loosening the strings to get it on and off the guitar. To make matters worse, those two rods are often bent underneath the truss cover, making them impossible to even fit with a truss rod wrench. Any experienced guitar tech, and most Rickenbacker owners, can name several other unusual characteristics that make them a challenge to work on. The payoff though, is that it all adds up to make one of the more recognizable sounds among electric guitars.
This 1960 (we think) model 360 pre-dates the dual truss rod design. But it suffers from that same buried truss rod condition we see in more recent guitars. Here’s a look underneath the nameplate/ truss-rod cover at thetruss rod and adjustment nut. You can see that it’s angled downward (the result of 50-plus years of string tension.) There’s no way to easily slip an adjustment wrench over the nut when this happens.
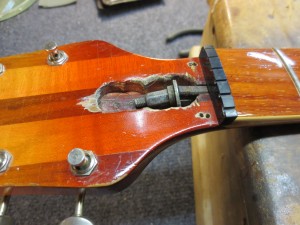
The culprit is the very week and thin washer just below the nut. It doesn’t offer enough leverage to keep the rod straight. That’s the part we’re going to change. You can also see how the factory created this cavity – by making three holes with a brad-point drill bit – a practice that has been long-since abandoned.
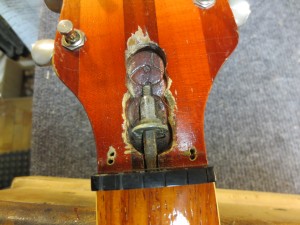
The good news is that a skilled repairman can carefully – but rather easily – remove the entire truss rod. (To discourage you from trying it yourself, we’re not going to show that step. We don’t recommend it even if you find photos elsewhere.)
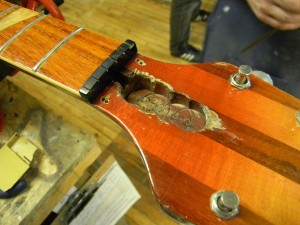
We then fabricated an aluminum block that is larger and stronger than that washer and fits perfectly into the existing space.
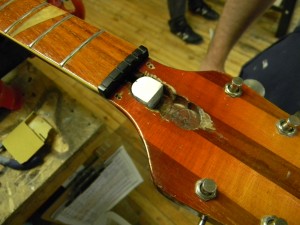
Once the block is properly fitted, we can center-tap it for the original truss rod, and fit it with a fresh brass nut. This improvement should last for many many years.
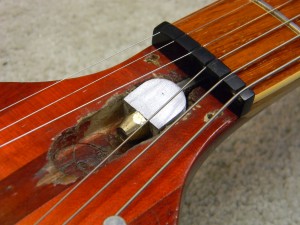
Once the truss rod repair is complete, we gave it The Works set-up and put the gold truss cover back into place.
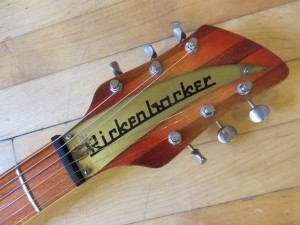
The wear mark to the left of the “R” is a result of the old rod nut. The cover is clear plastic which has been painted gold from underneath. It’s a beautiful old guitar that sounds just amazing. We’re glad it’s got another lifetime of music ahead of it.
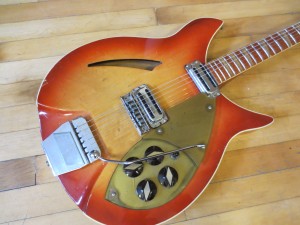

Just when I thought the GAS had passed, how I covet that guitar – and I don’t even have a legit use for it!
Seriously, another example of the ingenuity that makes you guys heroes -that and saving this beauty of music history.
the Rickenbacker guitars are the most beautiful instruments ever made. in South Africa virtually non-existent. what a pity.
Just thought I ring in on the Rickenbacker truss rod repair.
To start with the model you show in the photo when equipped from the factory with the “Accent†tremble arm, is a model “365â€, it’s a 360 when the standard tail peace is present.
I know this because I have a true 1960 model 365 “Capri†as it was called, which I purchased new in 1961. I still have the original bill of sale, and I must say mine is in much better shape.
Whoever did the butcher job on the truss rod cavity definitely wasn’t the factory. The chips in the finish by the brad-point drill bit show it was done some time long after it left the factory.
The original string nut that came with this guitar was about half as thick as the replacement shown, that’s why the cover plate holes were re-drilled .
But having to deal with all that damage I’d have to say your solution was unique.
Congratulations on keeping the old girl running.